In the realm of metalworking and crafting, the process of casting holds a certain allure. The gleaming finish of a freshly cast object, the intricacies of detailed designs, and the satisfaction from creating something tangible from raw materials bring joy to artisans and hobbyists alike. Among various materials and methods used in casting, one particularly fascinating technique involves employing a soldering iron along with lead solder. This article elucidates the nuances of this method, providing insight into its applications, intricacies, and the broader implications of engaging in this art form.
1. Understanding the Basics of Soldering
Soldering is a process that joins two or more electronic components or metal pieces together using a filler material, typically a lead-based or lead-free alloy. The solder melts when heated, flowing into the joint to create a strong, conductive bond upon cooling. While primarily associated with electronic assemblies, soldering techniques can also be ingeniously applied in craftsmanship—particularly in casting. Lead solder, known for its low melting point and excellent flow characteristics, becomes an integral player in the casting process.
2. The Allure of Lead Solder
Lead solder comprises a mixture of tin and lead, a combination celebrated for its remarkable properties. When heated, it melts to a low temperature, making it accessible for various applications. The unique liquid consistency of molten lead solder allows it to settle into the nooks and crannies of even the most intricate molds, making it an ideal medium for casting detailed shapes. However, this fascination comes with cautionary tales; lead’s toxicity necessitates careful handling and appropriate protective measures. Understanding this delicate balance between utility and safety deepens one’s appreciation for the medium.
3. Tools Required for Soldering and Casting
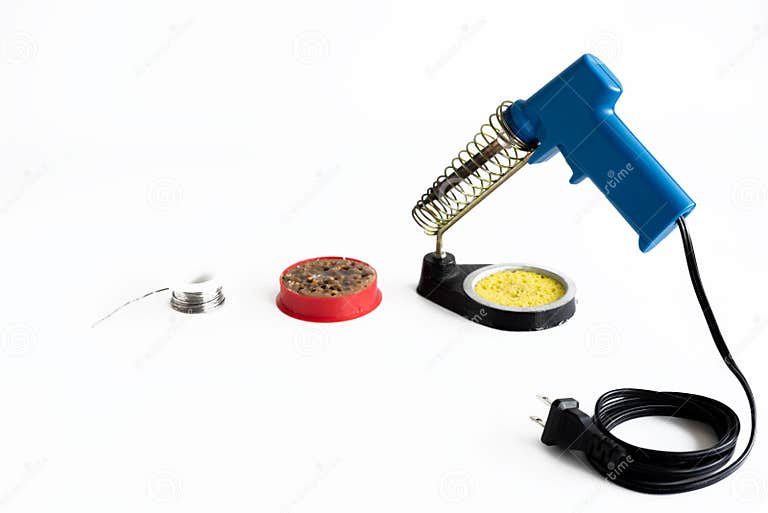
To embark on your casting journey with a soldering iron and lead solder, certain tools are crucial. The essential toolkit includes:
- Soldering Iron: A reliable soldering iron with adjustable temperature settings is paramount. The ability to control the heat ensures precision, particularly when tackling smaller, more detailed pieces.
- Lead Solder: Opt for high-quality lead solder for optimal results. The diameter of the solder wire can also impact your work; thinner wires are excellent for delicate details, while thicker varieties can provide robustness.
- Molds: Choosing or crafting molds that suit your design is essential. Silicone and metal molds are popular, as they allow for easy release of the cast item and endure the heat of molten solder.
- Protective Gear: Safety goggles, gloves, and masks are non-negotiable. Working with lead can release harmful fumes and particles; hence, proper ventilation and personal protective equipment are a must.
4. The Casting Process: Step-by-Step
The journey from raw material to finished object occurs through a series of methodical steps:
- Preparation: Set up your workspace, ensuring it is clean and well-ventilated. Assemble all your tools and materials within reach to streamline the process.
- Mold Preparation: If using a reusable mold, ensure it’s clean and free of any residues. For one-time molds, have your mixture ready. Consider lubricating the mold to facilitate easier release after casting.
- Melting the Solder: Plug in your soldering iron and set it to the appropriate temperature, typically around 350-400°F (175-200°C). Place the lead solder onto the tip of the iron, allowing it to melt into a liquid form.
- Pouring the Solder: Carefully direct the molten solder into your mold. Take your time with this step to ensure the solder flows into all cavities, capturing every intricate detail.
- Cooling: Once the mold is filled, allow the solder to cool completely. This process can take anywhere from a few minutes to an hour, depending on the size and thickness of the piece.
- Removing the Cast: Gently extract the cast object from the mold. If necessary, use a craft knife or file for cleaning up rough edges.
5. Exploring Creativity Through Casting
The true excitement of using a soldering iron and lead solder in casting lies in the endless possibilities for creativity. From crafting ornamental jewelry to designing bespoke home decor items, the skills and techniques acquired through solder casting serve as the foundation for innovation. Experimentation with molds and complex designs can lead to unique creations that reflect personal style and artistic vision.
6. Safety Concerns and Best Practices
Engaging in casting with lead solder also commands a high degree of responsibility. Awareness of the potential health hazards associated with lead exposure is crucial. Always maintain proper ventilation, utilize personal protective equipment, and wash hands thoroughly after handling lead solder. Consider incorporating lead-free soldering options, which are now widely available, to mitigate health risks while maintaining quality.
Conclusion
The art of casting using a soldering iron and lead solder is not merely a technical endeavor; it embodies a deeply rooted engagement with materiality, craftsmanship, and creativity. As you hone your skills and explore the vast possibilities inherent in this technique, you may find yourself enchanted by the simple yet profound process of transforming molten metal into cherished artefacts. This intimate interaction with the materials opens doors to both mastery and artistic exploration, inviting enthusiasts to discover the enchanting world of metal casting.


Leave a Comment