Ironing on a patch is an effective and artful way to add a personal touch to your clothing, revitalize worn fabrics, or even brand items for your business. This step-by-step guide will provide you with all the necessary techniques, tools, and insights to ensure a successful application. From selecting the appropriate patch type to mastering the technique itself, let’s delve into the world of fabric embellishments.
1. Understanding Patch Types
Before embarking on your patch application journey, it’s crucial to understand the various types of patches available:
- Embroidered Patches: These patches are crafted by stitching threads into the fabric, providing a textured, visually appealing finish. Ideal for intricate designs, they hold a robust quality.
- Iron-On Patches: Simplistic in design, these patches come pre-coated with heat-activated adhesive. They are particularly user-friendly and perfect for quick repairs.
- Velcro Patches: These patches employ a hook-and-loop system and offer the flexibility to interchange designs, making them great for uniforms or promotional items.
- Sequin and Decorative Patches: Infused with glamour, these patches add a sparkle to your garment. However, they often require additional care during application.
2. Gathering Your Materials
Choreographing a successful patch application requires a well-rounded toolkit. Ensure you have the following materials at hand:
- Patch: Choose your desired patch, ensuring that it is iron-on compatible.
- Iron: A standard home iron will suffice; just ensure it can reach the required temperature. Steam irons may not yield the best results.
- Ironing Board: While any flat, heat-resistant surface will work, a dedicated ironing board will provide better results.
- Protective Cloth: A piece of cotton fabric or parchment paper will shield both the patch and the garment from direct heat.
- Scissors: For trimming excess fabric, if necessary, to achieve a cleaner look.
- Spray Starch (Optional): This can be used to stiffen the garment before application, ensuring a firmer base.
3. Preparing the Garment
The journey towards a polished patch application begins with meticulous preparation:
- Pre-Wash the Fabric: Wash and dry your garment beforehand. This removes any residues and ensures that the fabric fibers are clean and receptive to the adhesive.
- Identify Placement: Lay your garment flat, and visualize or pin where the patch will sit. Use a measuring tape for accuracy, particularly for larger patches.
- Iron the Area: Using the iron on the correct setting, press the area where the patch will be applied. This helps eliminate wrinkles and creates a smooth surface.
4. Attaching the Patch
Now that your materials and garment are prepared, you can proceed with the actual attachment:
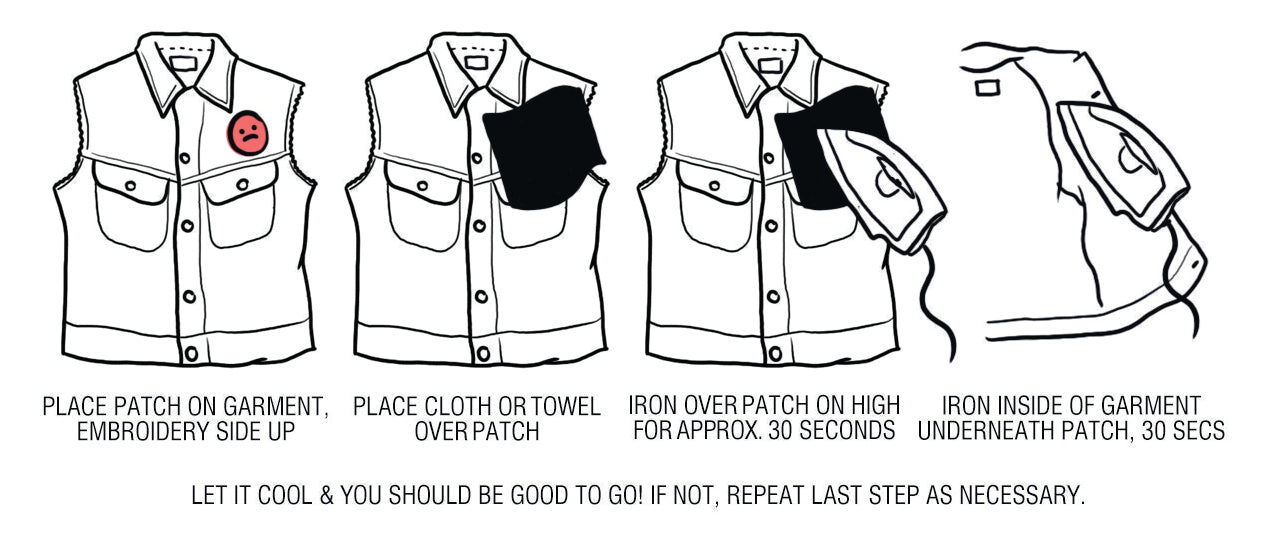
- Position the Patch: Center the patch on the designated area. It is essential for aesthetic balance.
- Cover the Patch: Place the protective cloth over the patch to safeguard it from direct contact with the iron.
- Heat Application: Set your iron to a medium temperature (generally around 250°F to 300°F). Press the iron down firmly onto the patch for approximately 30 seconds. Make sure to apply even pressure. Do not slide the iron back and forth, which can shift the patch off its intended mark.
- Check Adhesion: After the initial pressing, allow the patch to cool for a few seconds. Gently lift a corner of the patch to assess if it has adhered. If necessary, repeat the heating process.
5. Post-Application Care
Once you’ve successfully adhered the patch, a few steps can enhance its longevity:
- Let it Rest: Allow the garment to sit undisturbed for 24 hours to ensure the adhesive sets thoroughly.
- Avoid Direct Washing: When it comes time to launder, turn the garment inside out to preserve the patch. Hand washing is often gentler.
- Iron the Patch Periodically: If the edges begin to lift after several washes, repeat the heating process, using the protective cloth once more.
- Store Properly: Fold or hang the garment in a way that prevents the patch from being snagged or pulled. Avoid storage in damp conditions, which can affect adhesion.
Conclusion
Ironing on a patch can transform your items while allowing for personal expression and repair. By understanding the types of patches and following the outlined steps meticulously, you can achieve a professional-looking finish. Embrace the creative potential that patches provide and enjoy the satisfaction of both mending and beautifying your garments. Whether for fashion, function, or festivity, an iron-on patch is more than just a decorative element; it’s an opportunity to showcase your unique style and flair.








Leave a Comment