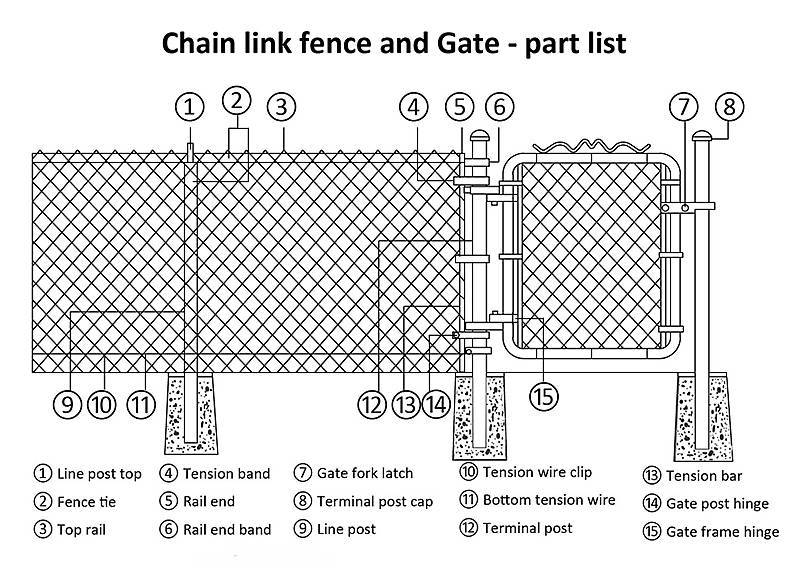
Setting up a chain link fence can be a rewarding endeavor, enabling you to define your property boundaries, enhance security, and even augment the aesthetic appeal of your yard. With its enduring design and practical functionality, a chain link fence is often a go-to choice for homeowners seeking both durability and unobtrusiveness. Let’s delve into a step-by-step guide on how to erect your own chain link fence, addressing common observations while hinting at the deeper nuances that can make this task remarkably engaging and fulfilling.
1. Planning and Preparation:
Before you embark on your fencing journey, meticulous planning is indispensable. Begin by determining the precise area you wish to enclose. Use stakes and string to outline the perimeter, ensuring that your fence will follow this path closely. Consider factors such as trees, shrubs, or any existing structures that may alter your fencing plans. Additionally, investigate local zoning laws—these regulations may dictate the height, material, or placement of the fence, ensuring that your project adheres to community standards.
2. Gathering Materials and Tools:
Once your plan is in motion, it’s time to gather your materials. A standard chain link fence requires specific components: chain link fabric, terminal posts, line posts, tension bands, and top rails. You’ll also need concrete for setting the posts and perhaps barbed wire if extra security is desired. Equip yourself with the proper tools, including a post hole digger or auger, a level, wire cutters, and a high-quality measuring tape. Each of these tools will serve vital roles in the installation process. The right materials and equipment not only expedite your labor but also ensure a professional finish.
3. Establishing the Fence Line:
With your materials at hand, commence the installation by marking the locations of your fence posts. Standard spacing is approximately 10 feet between each line post, while terminal posts should be positioned at corners and gates. The depth of the post holes should be around one-third of the post length, allowing for stability and resilience against the elements. Utilizing a level as you secure your posts will help maintain an even structure, enhancing both the appearance and durability of your fence.
4. Setting the Posts:
Drill down into the earth with a post hole digger, creating holes that comfortably accommodate your posts. Once the holes are dug, place each post in its designated spot, ensuring all are aligned vertically. The next step is pouring concrete at the base of each post to solidify it. This concrete cure often demands at least 24 hours, during which time the posts must remain undisturbed to secure their position effectively.
5. Attaching the Top Rail:
Once the posts are firmly set, attach the top rail to the terminal posts using rail ends. Make sure to employ a level to guarantee that the rail runs horizontally straight across, as any deviation can lead to an unappealing and unstable fence structure. The rail serves a dual purpose: it adds extra rigidity to the fence and assists in the proper alignment of the chain link fabric you will be installing next.
6. Installing the Chain Link Fabric:
Now comes the defining moment of your fencing project—installing the chain link fabric. To initiate this process, unroll the fabric along the fence line. Begin attaching at one terminal post using tension bands to secure one end. Gradually work your way along the fence, pulling the fabric taut and attaching it to each line post with specially designated brackets. Ensure that it is evenly distributed to maintain both security and visual appeal.
7. Adding Tension Wire:
For additional support, particularly in areas prone to high winds, consider adding a tension wire. This wire runs along the bottom of the chain link fabric, anchoring it to the line posts and reinforcing the overall stability. Secure the tension wire with wire ties, ensuring an even distribution of tension across the fabric.
8. Final Touches:
Having installed the fabric, it’s crucial to trim any excess material and inspect the entire fence line for potential imperfections. You may wish to paint the chain link if aesthetics are a concern, or leave it in its natural galvanized state for a more industrial look. Installation of gates should be undertaken last, ensuring that they swing freely and align correctly with the rest of the fence.
9. Maintenance Considerations:
Although chain link fences are known for their durability, regular maintenance can prolong their lifespan. Check the tension wire and fabric periodically for any signs of wear or rust, and ensure that the posts remain secure. A light cleaning can also aid in maintaining a tidy appearance, enhancing the overall appeal of your property.
In conclusion, erecting a chain link fence is more than just a project; it’s an exercise in precision, aesthetics, and personal expression. With thoughtful planning and execution, not only does the finished product serve a functional purpose, but it can also transform your outdoor space into a well-defined retreat. As you admire your handiwork, you’ll understand the deeper reasons behind the satisfaction that comes from building something that stands resilient against time and nature, evoking a sense of accomplishment and pride in your abode.









Leave a Comment