In the grand theater of home maintenance, the humble toilet is often relegated to the role of an unsung hero. It performs its duties silently, a steadfast companion in our daily routines. However, just as in life, there are moments when we must take charge and ensure everything is functioning smoothly. One such moment arises when it becomes necessary to turn off the toilet water supply. Whether due to a leak, repairs, or an unexpected deluge, understanding how to artfully halt the flow is a vital skill for every homeowner. Below, we delve into the comprehensive guide to turning off toilet water, illuminating the path with clarity and purpose.
Understanding the Anatomy of Your Toilet
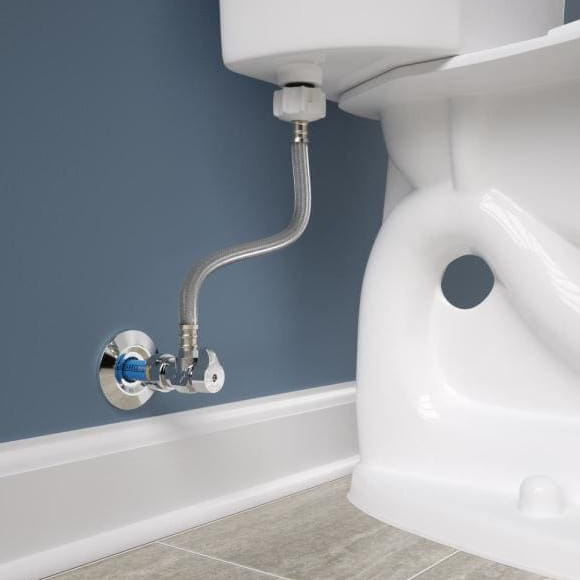
Before embarking on this journey, one must familiarize oneself with the intricate anatomy of the toilet. Like a finely tuned machine, the toilet comprises several crucial components that work in harmony. The most pertinent element is the water supply valve, often likened to a gateway that controls the flow of water from the plumbing system to the tank. This valve can typically be found at the base of the toilet, often positioned directly behind it or alongside the wall. Understanding its location will serve as the keystone in our dismantling of water flow.
Step 1: Apprehend Your Surroundings
Before taking action, conduct a cursory inspection of your surroundings. Is there ample space for maneuvering? Are there any obstructions that could impede your efforts? Clear away any items that may obstruct your access to the water supply valve. Consider this your own preparatory ritual—a moment to center your focus and ensure you are armed with the necessary tools: perhaps a towel or rag for spills, and a flashlight to illuminate dark corners.
Step 2: Identify the Valve
Having prepared your workspace, it’s time to locate the water supply valve. This valve typically resembles a small lever or a round handle, making it relatively easy to identify. It is usually chrome or brass and may exhibit signs of wear from years of service. The valve itself can be either a gate valve or a ball valve. A gate valve can be closed by turning the handle clockwise, while a ball valve is a simple quarter-turn mechanism that flips the flow on or off with remarkable ease. A keen eye will help you discern its operating mechanism.
Step 3: Turn Off the Valve
Once you have located the valve, it’s time to put theory into practice. For a gate valve, grasp the handle and turn it clockwise until you can turn it no further; this is like the final note in a symphony, signaling the cessation of flow. For a ball valve, confidently turn it a quarter-turn until it sits perpendicular to the pipe, showcasing its defiance against the incoming water. Be mindful, as there may be residual water in the tank that could spill. Having a towel at the ready can mitigate any mess.
Step 4: Confirm the Water is Off
Having enacted the closure of the valve, a brief moment of patience is required. Flush the toilet and observe the tank. If it refills, the job remains undone. Listen intently: the sound of rushing water should cease, replaced only by the echoing silence of a job well done. Should there be any residual water trickling from the tank, now may be the ideal time to reassess the valve’s positioning.
Step 5: Address the Underlying Issue
With the water supply successfully halted, you can now turn your attention to the underlying issue—the proverbial root of the problem. Whether it be a leaky seal, a malfunctioning flapper, or the need for a complete toilet overhaul, you are now in the advantageous position to tackle these challenges without the daunting presence of water complicating your task. Ensure you have the appropriate tools and materials before commencing any repairs.
Step 6: Restoring Water Flow
Once your repairs are complete, it is time to reverse the process and usher in the water once more, akin to welcoming back a long-lost friend. Gently turn the water supply valve counterclockwise, either restoring the flow of water with the grace of an artist unveiling their masterpiece. Lean in, attuned to the sounds of movement within the toilet tank; a full tank should indicate that normalcy has returned.
Step 7: Final Inspection
Your mission culminates with a thorough inspection. Flush the toilet a few times, ensuring that the repairs have held and that no leaks have resurfaced. Revel in your mastery over the situation, the silent satisfaction of a problem tackled with poise. For indeed, the ability to turn off toilet water is more than a mere skill; it is a testament to your fortitude and capability as a steward of your own domain.
In conclusion, turning off toilet water may appear a mere footnote in the greater narrative of home maintenance, yet it is an essential skill that cannot be overlooked. This unassuming act requires knowledge, precision, and a calm demeanor—qualities that serve well beyond the realm of plumbing. Like a seasoned conductor leading an orchestra, you now possess the tools to manage the ebbs and flows of your household with confidence and ease.










Leave a Comment