In the world of printing, cost efficiency and sustainability have become paramount concerns for both individuals and businesses alike. The Brother LC501 ink cartridges, while renowned for their quality, can leave a noticeable dent in budgets over time. This reality has propelled many towards a burgeoning interest in DIY refill kits. These kits not only promise a remarkable reduction in expenses but also render a satisfying opportunity for creativity and resourcefulness. In this article, we will delve into the intricacies of DIY refill kits for Brother LC501 cartridges, exploring their components, the advantages, and the step-by-step process that elevates the mundane task of refilling ink into a gratifying endeavor.
Understanding the LC501 Ink System
Before embarking on the refill journey, it’s imperative to grasp the anatomy of Brother’s LC501 ink cartridges. These ink systems are designed with a careful balance of performance and efficiency. Each cartridge generally contains four colors: black, cyan, magenta, and yellow. Their formidable construction ensures seamless integration with Brother printers, producing vivid prints. However, with regular use, these cartridges can drain swiftly, leading to a recurring cycle of replacement that many consumers yearn to escape.
The Allure of DIY Refill Kits
There exists a palpable charm when it comes to DIY projects. The allure of personalization, mixed with the prospect of significant savings, creates a compelling case for using refill kits. Additionally, such kits offer an opportunity to engage with one’s printing device in a more intimate way. Contributing to a greener ecosystem by mitigating waste produced by disposable cartridges adds another layer of satisfaction, almost a reconciliation with one’s consumer habits. With the right tools and a bit of practice, refilling cartridges transforms into both a functional and enjoyable process.
Components of a Typical Refill Kit
A typical DIY refill kit for Brother LC501 cartridges comprises several essential elements. Familiarizing oneself with these components is crucial for a successful refilling experience:
- Ink Bottles: The heart of the refill kit, these specially formulated inks are designed to mimic the original cartridges’ output in terms of color and quality.
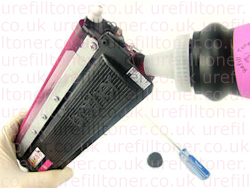
- Refill Syringe: This instrument features a needle attachment that facilitates the precise transfer of ink into the cartridge, ensuring minimal spillage.
- Protective Gloves: To maintain cleanliness, a pair of gloves is typically included to avert ink stains on hands.
- Funnel: Although not always included, a funnel can prove handy for those who prefer an added layer of precision while refilling.
- Instruction Manual: A guide that details the process step-by-step, ensuring users can navigate the refilling process with confidence.
Advantages of Using DIY Refill Kits
The advantages of opting for DIY refills extend well beyond mere cost savings. Here are several compelling reasons to embrace this approach:
- Economical: Refilling ink can save consumers up to 50-70% compared to purchasing new cartridges, making it an economically sound choice.
- Environmental Impact: Refilling cartridges significantly reduces waste, contributing to more sustainable consumer practices and a smaller carbon footprint.
- Quality Control: When refilling, users can select high-quality ink that meets their specific printing needs, leading to potentially superior printouts compared to generic replacements.
- Increased Lifespan: Regularly refilling cartridges can extend their lifecycle, offering improved utility over time.
- Empowerment: Successfully refilling cartridges builds confidence and a sense of self-sufficiency, leading to a more engaged and informed consumer.
Step-by-Step Guide to Refilling Brother LC501 Cartridges
With components in hand, here is a comprehensive, step-by-step process to navigate through the refilling of Brother LC501 cartridges.
- Preparation: Gather all required tools, ensuring a clean workspace to avoid ink spillage.
- Wear Gloves: Don your protective gloves to keep ink off your skin.
- Remove the Cartridge: Carefully detach the cartridge from your printer, following manufacturer instructions to prevent damage.
- Identify the Fill Holes: Locate the designated fill holes. These are often marked and are essential for introducing new ink.
- Fill the Syringe: Using the syringe, draw the appropriate amount of ink from the bottle. It’s recommended to fill only to the maximum capacity indicated.
- Inject the Ink: Firmly yet gently insert the syringe into the fill hole at an angle, then slowly inject the ink. Avoid overfilling, as this can lead to leaks.
- Seal the Cartridge: After refilling, seal the opening with tape or the cap if applicable.
- Cleanup: Clean any excess ink spills with a damp cloth, disposing of syringes and gloves responsibly.
- Reinstall: Reinsert the cartridge into the printer and run a test print to ensure functionality.
Conclusion
Embarking on the journey of refilling Brother LC501 cartridges with a DIY kit not only represents a wise financial decision but also enriches the user’s experience. The knowledge acquired through this process fosters a sense of accomplishment and responsibility towards sustainable printing solutions. In an age of disposability, engaging in refilling practices encourages both individual empowerment and environmental stewardship. As modern consumers continue to navigate the complexities of quality and cost, DIY refill kits will undoubtedly remain an attractive option for those seeking both value and fulfillment in their printing endeavors.


Leave a Comment