Water is one of life’s essential elixirs, a silent companion that nurtures our existence. It flows through our lives like an unassuming river, but the purity and quality of this liquid treasure can be obscured by the presence of hard minerals. Installing a soft water system is akin to cultivating a lush, vibrant garden in a parched landscape—it transforms the mundane into the extraordinary. This guide elucidates the necessary steps to install a soft water system, ensuring you savor the sweet taste of soft water in the comfort of your home.
Understanding Hard Water and Its Effects
Before embarking on the journey to softness, it’s imperative to comprehend the nature of hard water. Enriched with minerals like calcium and magnesium, hard water can wreak havoc in various ways—from scaling your appliances to dulling your skin and hair. Think of it as an uninvited houseguest, leaving a trail of disruption in its wake. A soft water system serves as the antidote, replacing those intrusive minerals with sodium or potassium, thereby bestowing upon you the luxurious benefits of softer water.
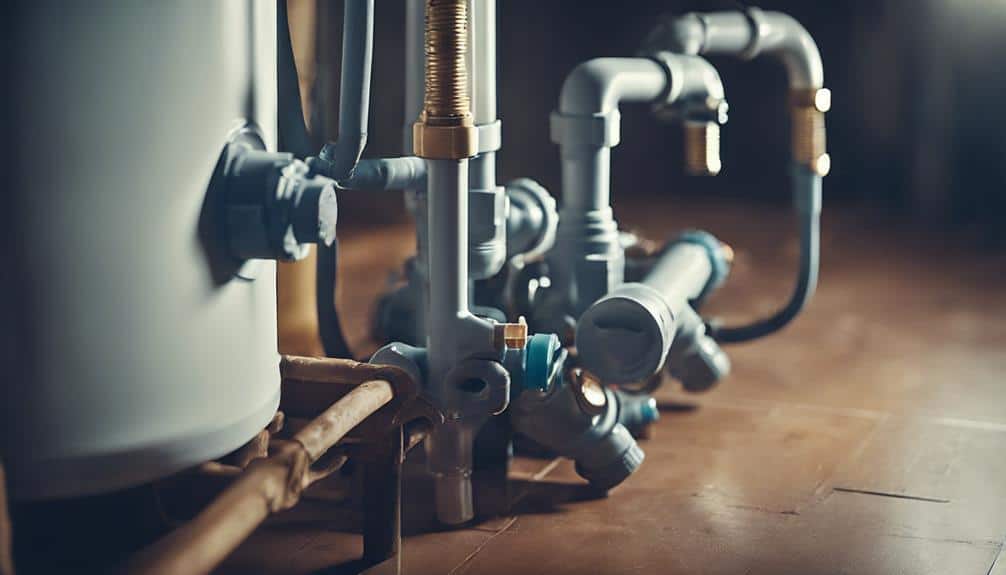
The Components of a Soft Water System
Much like a symphony orchestra, each component of a soft water system plays a vital role in achieving harmony. The primary elements include:
- Water Softener Unit: The heart of the system, where the magic of ion exchange occurs.
- Sodium or Potassium Pellets: The essential agents replacing the hard minerals in the water.
- Brine Tank: A reservoir that holds the salt or potassium solution used in the regeneration process.
- Control Valve: The meticulous conductor that regulates the flow of water through the system.
Understanding these components will empower you to orchestrate the installation seamlessly.
Step-by-Step Installation Guide
Now that we have acquainted ourselves with the nuances of hard water and the essential components of a soft water system, let’s delve into the installation process. Approach this task with the precision of an artisan, ensuring each step is executed with care and attention.
1. Gather the Necessary Tools:
Before you don your DIY cape, collect the tools you’ll need, including:
- Pliers
- Crescent wrench
- Drill and drill bits
- Utility knife
- Measuring tape
- Bucket (for potential spills)
2. Choose the Optimal Location:
Finding the right spot for your soft water system is akin to selecting the ideal canvas for a masterpiece. The area should be near your main water supply line, with access to an electrical outlet and ample drainage for the brine tank. Ensure the location is shielded from extreme temperatures to prolong the life of your system.
3. Turn Off Your Water Supply:
Before making any alterations to your plumbing, shut off the main water supply. This step is essential, like pausing a movie before you make any edits to the script.
4. Cut the Main Water Line:
Utilize your utility knife to carefully cut the main water line at the chosen installation site. This incision is a critical juncture, allowing for the softener to embrace the flow of hard water.
5. Connect the Water Softener:
Following the manufacturer’s instructions, install the bypass valve on the water softener. Connect the inlet and outlet ports to the corresponding sections of the main water line. Tighten the connections with the crescent wrench, ensuring there are no leaks—a meticulous task that demands attention.
6. Install the Brine Tank:
Next, position the brine tank near the water softener. This tank is the reservoir of transformation, where your sodium or potassium pellets reside. Feed the brine line from the softener to the brine tank, ensuring it is well-secured to prevent any interruptions in the flow of the softening solution.
7. Fill the Brine Tank:
Once in place, fill the brine tank with the appropriate salt or potassium pellets, following the manufacturer’s recommendations. This is akin to sowing seeds in fertile soil—the ingredients are essential for fruitful results.
8. Turn the Water Supply On:
With everything in place and secure, turn the main water supply back on. Begin the initial regeneration process by manually activating the system, allowing soft water to flow through your home for the first time.
9. Test for Hardness:
After your system has cycled through its first regeneration, it’s wise to test the water for hardness. Utilizing a test kit can affirm that your installation has been a success. If the water is still hard, it may require adjustments in settings or pellet amounts.
10. Maintain Your Soft Water System:
To sustain the delightful advantages of soft water, regular maintenance is paramount. Ensure that the salt level in the brine tank is consistently monitored, and the system undergoes periodic regeneration as per the manufacturer’s guidelines. Maintenance is the cornerstone of longevity, ensuring your soft water system remains a steadfast sentinel against hard water’s unrelenting presence.
Conclusion
Installing a soft water system is a transformative endeavor, ushering in a realm where hard water no longer reigns supreme. As you bask in the comforts of soft water—a lush oasis manifesting in your showers, laundry, and dishes—the efforts invested in this installation bird-like take flight, elevating the standard of your everyday life. With diligence and dedication, your home will flourish, free from the constraints imposed by hard water, revealing a softness that truly resonates throughout your life.


Leave a Comment