
Creating a rag quilt can be a gratifying experience that combines creativity, nostalgia, and functionality. Unlike traditional quilts, rag quilts feature exposed seams that add a whimsical and tactile element, making them particularly suitable for cozying up on chilly evenings or as playful décor. In this guide, we will explore the various facets of creating a rag quilt, from selecting materials to finishing touches, so you can make a beautiful, functional piece of art for your home or as a cherished gift.
1. Gather Your Supplies
Before embarking on your rag quilt journey, you’ll need to assemble a variety of materials:
- Fabric: Choose soft cotton fabrics, flannel, or a combination thereof. Consider using remnants from previous projects or collect colorful patterns to create visual interest.
- Batting: While optional, batting can be included for added warmth. If you decide to use it, select a lightweight material.
- Thread: Use strong, contrasting thread that complements your fabric selection. A thicker weight can make the stitching stand out more prominently.
- Rotary cutter and mat: For precise cutting, a rotary cutter and a self-healing mat are indispensable tools.
- Rulers: Clear quilting rulers assist in measuring and cutting straight lines.
- Sewing machine: A reliable sewing machine is crucial for stitching multiple layers together smoothly. Optional accessories, like walking feet, can help manage thicker seams.
- Scissors: A sharp pair of scissors will come in handy for snipping seams later.
- Pins or clips: These help hold layers together while you sew.
- Iron: A good iron is vital for pressing your seams and fabric edges.
2. Select Your Design and Calculate Measurements
The next step involves choosing the design and dimensions of your rag quilt. Popular configurations include a classic checkerboard pattern or a more intricate layout. Regardless of your choice, consider these guidelines:
- Block Sizes: Standard block sizes are usually 6 to 12 inches. To decide on a size, think about how big you want your quilt to be, and then calculate how many blocks will fit based on your fabric yardage.
- Layout Design: Before cutting any fabric, sketch out your design or create a digital mockup. This visual representation can guide you and help avoid costly mistakes.
3. Cutting the Fabric
Once you have your design sketched and measurements calculated, it’s time to get cutting. Precision is key here:
- Layering Fabric: Stack your fabric pieces in layers to cut multiple blocks at once, ensuring consistency in size and shape.
- Cutting Method: Use a rotary cutter for sharp, clean edges. Place your ruler along the edges of the fabric and cut along its length to ensure straight lines.
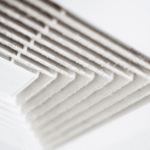
- Snip the Seams: After sewing, you’ll want to add texture by snipping the seams. Cut each exposed seam about ¼ inch apart but avoid cutting through the stitches themselves.
4. Assemble Your Quilt Top
Now comes the delightful part—assembly:
- Arrange Blocks: Lay out your fabric blocks on a flat surface according to your design, adjusting as necessary to achieve a visually appealing layout.
- Sewing Rows: Begin by sewing together rows of blocks using a ¼ inch seam allowance. Press the seams open or to one side, depending on your preference.
- Join Rows: After completing all rows, carefully join them together, ensuring all edges align correctly.
5. Adding Backing and Batting (If Desired)
If you opted to use batting or a backing fabric, this is the stage to add those layers:
- Layering: Place the backing fabric face down, followed by the batting (if using), and lastly, the quilt top right side up. Ensure all layers are aligned.
- Pinning: Secure the layers together with pins or clips to avoid shifting during sewing.
- Basting (Optional): Basting can also be done with long stitches to temporarily hold layers together before the final stitching.
6. Stitching the Quilt Together
Now, it’s time to sew the layers together:
- Quilting Method: You can choose to quilt along the seams or create a more intricate design as desired. A crisscross or grid pattern can work well with rag quilts.
- Finishing Seams: Use a zigzag stitch along the edges of the quilt to prevent fraying and reinforce the seams.
7. Prepare for the Ragging Process
Now that you have completed sewing your quilt, it’s time to give it that signature ragged look:
- Trim Excess: Trim any excess batting that extends beyond the quilt top.
- Snipping: Use sharp scissors to snip the exposed seams, creating fringe and adding texture. Aim for about ¼ inch intervals for consistent fringing.
8. Wash and Dry
To finish your rag quilt, it’s essential to wash it, as this allows the seams to fray further and softens the fabric. Use a gentle cycle and a mild detergent. Tumble dry on low to enjoy the delightful ragged edges.
Conclusion
Creating a rag quilt is both an artistic and practical endeavor. Following these steps, you can craft a charming and cozy quilt that tells a story through color, texture, and design. Whether you keep it for yourself or gift it to someone special, your rag quilt will undoubtedly become a treasured keepsake, cherished for years to come. Happy quilting!


Leave a Comment