
Short Answer
Before casting off on a coastal passage, the standing rigging deserves the same level of attention as the engine, fuel, and weather forecast. A rig failure rarely announces itself politely; it tends to arrive as a crash of wire and aluminum, often at the worst possible moment. The good news is that most rig failures are predictable. A systematic pre-passage inspection—from chainplates to masthead—can catch corrosion, fatigue, and misalignment weeks before they become emergencies. This guide explains what to check, how to check it, and when to call in a professional.
Main Explanation
What it is
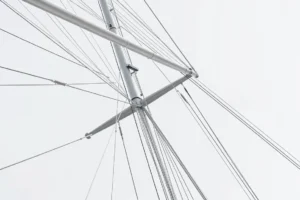
Standing rigging inspection is the process of examining the fixed wires, rods, terminals, turnbuckles, chainplates, tangs, spreaders, and mast fittings that hold the rig upright. Unlike running rigging, which moves and is replaced more frequently, standing rigging is under constant tension and subject to metal fatigue, crevice corrosion, and stress cracking. A pre-coastal-passage inspection is not a full rig survey; it is a focused, deck-to-masthead audit designed to identify developing problems before they fail. It is a seamanship practice, not a product tied to any boat brand, school, or equipment manufacturer.
Why it matters
Rig failure is among the most catastrophic events a coastal sailor can face. A lost mast can injure crew, damage the hull, and leave the boat without propulsion or communication. Most riggers generalize that standing rigging has a service life of about a decade, or one circumnavigation’s worth of use, after which the likelihood of problems rises sharply. Insurance companies often recommend replacement at the 10-year mark. But even within that window, ignored water intrusion at deck seals, hairline cracks in swage fittings, and broken wire strands can develop quickly. Coastal passages may be shorter than ocean crossings, but they often involve more traffic, harder groundings, and less time to react. A regular inspection cuts through information overload and conflicting advice by giving you a clear, evidence-based picture of your own rig.
How it works
A thorough inspection works from the deck upward, checking each load-bearing component in turn. Start with chainplates: remove cosmetic covers and look for rust streaks, stress cracks in the surrounding deck or hull, and any sign of water intrusion. Next, examine turnbuckles and bottlescrews for cracks, corrosion, and secure cotter pins. Run your fingers along each wire, feeling for broken strands or ‘meat hooks.’ Inspect swage and mechanical terminals for hairline cracks, especially where the wire enters the fitting. Use a magnifying glass and flashlight. Check spreader tips, tangs, and mast fittings for corrosion or elongation. Finally, sight up the mast to confirm it is straight and properly tuned. If you cannot go aloft safely, use binoculars or a camera with a zoom lens from deck level, but recognize that close-up inspection of upper terminals may require a professional.
How to do it
Plan half a day, do it in daylight and calm weather, and treat anything you cannot explain as a problem until proven otherwise. Step 1: Secure the boat and remove deck covers from all chainplates. Look for rust streaks on the interior, stress cracks radiating from the slot, and gelcoat crazing around the seal. Step 2: Inspect each turnbuckle. Check for straightness, cracks, and corrosion; ensure cotter pins are present and not bent excessively. Step 3: Run a rag or bare hand along each shroud and stay, feeling for broken strands. Pay special attention to the lower 2–3 feet and any area that passes through spreaders. Step 4: Examine swage fittings with a magnifying glass. Look for circumferential cracks, rust weeping from the swage, or any deformation. Step 5: Check spreader roots and tips, tangs, and mast attachments for corrosion, loose fasteners, or misalignment. Step 6: Sight up the mast from the base and from a distance to confirm it is straight; check for any lean or S-curve. Step 7: Verify rig tension by hand or with a tension gauge; compare port and starboard shrouds. Step 8: Document every finding with photos and notes, and re-tension or replace components as needed. If you find any cracked swage, broken strand, or significant corrosion, do not sail until it is addressed.
When not to do it
A pre-passage inspection is not a substitute for a professional rig survey. Do not rely solely on your own inspection if the rig is more than 10 years old, has been through a grounding or dismasting, or shows signs of hidden crevice corrosion. If you are not trained and equipped to go aloft safely, hire a rigger for the upper sections. If you find any crack, broken strand, or water intrusion at a chainplate, stop and consult a professional before sailing. Similarly, if you are new to boat ownership or unsure what you are looking at, a certified rigger or marine surveyor can provide a baseline assessment and teach you what to monitor.
Visual
- Secure the boat and gather tools: flashlight, magnifying glass, rag, camera, rigging tape, cotter pins.
- Inspect chainplates and deck seals for rust, cracks, and water intrusion.
- Check turnbuckles and bottlescrews for cracks, corrosion, and secure cotter pins.
- Run your hand along each wire to feel for broken strands or meat hooks.
- Examine swage and mechanical terminals with magnification for hairline cracks.
- Inspect spreaders, tangs, and mast fittings for corrosion and loose fasteners.
- Sight up the mast to confirm it is straight and properly tuned.
- Document findings and address any issues before departure.
Common Mistakes
Skipping chainplate inspection because it is hidden
Water intrusion can corrode the chainplate below deck, leading to sudden failure. Always remove cosmetic covers and inspect both the deck side and the interior side for rust streaks, stress cracks, and moisture.
Relying only on a visual check from deck level
Upper terminals and spreader tips can hide cracks that are invisible from the deck. Go aloft safely or use a high-resolution camera with zoom. If you cannot get close enough, hire a professional rigger.
Ignoring minor rust or hairline cracks
Crevice corrosion can progress rapidly under load, and a small crack in a swage fitting can lead to complete failure. Treat any crack, rust weeping, or deformation as a stop-sailing issue until professionally assessed.
Using a generic checklist without adapting to your boat
Different rig types—rod vs. wire, swage vs. mechanical terminals—have different failure modes. Know your rig’s age, material, and manufacturer recommendations, and tailor the inspection accordingly.
Assuming a shiny rig is safe
Stainless steel can look fine externally while corroding internally, especially inside swage fittings and chainplate slots. Consider age and service history, not just surface appearance.
Not re-tensioning after inspection
Loose rigging can cause shock loads and accelerated fatigue. After any component replacement or adjustment, tune the rig to the manufacturer’s specifications and verify the mast remains straight.
Safety Note
Digital checklists and reference guides are useful, but they complement—never replace—hands-on inspection, professional training, and human judgment. Always cross-check critical data such as weather, tides, and navigation with official sources before departure. Never use a phone or tablet as your only navigation tool; keep paper charts and a handheld VHF as backups. When going aloft, use a dedicated climbing harness, a second person on deck, and a properly maintained halyard. Follow the manufacturer’s guidelines for your rig and the relevant sections of the COLREGS and local maritime regulations. If you have any doubt about the integrity of your standing rigging, postpone the passage and consult a certified rigger.
FAQ
How often should I inspect standing rigging before a coastal passage?
At minimum, do a visual and tactile check before every coastal passage. A more thorough deck-to-masthead inspection should be done at least annually, and a professional rig survey every 1–2 years or after any hard grounding, dismasting, or severe weather.
What are the first signs of standing rigging failure?
Look for broken wire strands (meat hooks), rust streaks from swage fittings or chainplates, hairline cracks around terminals, loose or bent cotter pins, and any change in rig tune. Water intrusion at deck seals is a common precursor to chainplate failure.
Can I inspect standing rigging from the deck, or do I need to go aloft?
You can spot many problems from deck level using binoculars and a camera with zoom, but a proper inspection requires close examination of upper terminals, tangs, and spreader tips. If you are not trained and equipped to go aloft safely, hire a professional rigger.
When should I replace standing rigging instead of just inspecting it?
Most riggers and insurers recommend replacement around 10 years or after one circumnavigation's worth of use, whichever comes first. Replace immediately if you find cracked swages, broken strands, significant corrosion, or any fitting that has been overloaded.























Leave a Reply