In the world of food preservation, Mylar bags are akin to sturdy vaults that safeguard treasures from the relentless tide of oxidation and moisture. When sealed effectively, they can prolong the shelf life of your goods, locking in flavor, nutrients, and freshness. Utilizing a clothes iron as a sealing tool might seem unconventional, yet it provides a remarkable blend of simplicity and efficacy. This guide will navigate you through the intricate process of sealing Mylar bags using a clothes iron, ensuring that your stored items remain in pristine condition, like precious artifacts in a museum.
1. Gather Your Materials
Before diving into the sealing process, assemble all the necessary materials. A clothes iron, Mylar bags, a craft knife or scissors, a flat, heat-resistant surface, and a damp cloth or paper towel should be within reach. The right preparation serves as a foundation, similar to how an artist gathers their palette before creating a masterpiece.
2. Choose the Right Mylar Bag
Mylar bags come in various thicknesses and sizes, each adept at protecting different contents. Opt for bags that are at least 2-6 mil thick; this thickness ensures a robust seal that can withstand storage rigors. Consider the width of the openings and the quantity of items you intend to store. This attention to detail is crucial, for the right bag is the canvass upon which your preservation skills will flourish.
3. Prepare Your Workspace
Imagine setting up your studio before an intricate painting. Your workspace should be clean, clutter-free, and equipped with an iron resting on a flat surface. Ensure the iron’s plate is clear of any residue, as it could alter the integrity of the seal. A steady surface also provides the stability needed to apply consistent pressure as you seal the bags.
4. Fill the Mylar Bag
As you fill the Mylar bag with your desired contents, leave enough space at the top to create a tight seal—approximately 2 to 3 inches should suffice. Avoid overfilling; an overflowing bag is like an overflowing cup—a recipe for disaster. Gently compress the contents, ensuring an even distribution without creating crannies where air might hide.
5. Remove Excess Air
Air is the enemy when it comes to storage. Before sealing, squeeze the bag gently to expel as much air as possible. Think of it as giving your contents a refreshing hug, driving away the unwanted air that could lead to spoilage. For an even more airtight seal, consider using a vacuum sealer if available, or employ the water immersion method for smaller bags.
6. Preheat the Clothes Iron
As an artist warms up their brush, so too must you prepare your iron. Set it to a medium temperature, neither too hot nor too cool, as you want to melt the Mylar without scorching it. Allow the iron to preheat for several minutes, ensuring it reaches a steady temperature perfect for effective sealing.
7. Align the Seal Area
Take a moment to meticulously line up the top of the bag. The edge should be straight, free of any twists or folds. Like aligning the horizon in a landscape, precision is vital; a misalignment may lead to failed seals. Smooth out any wrinkles along the top of the bag for optimal results.
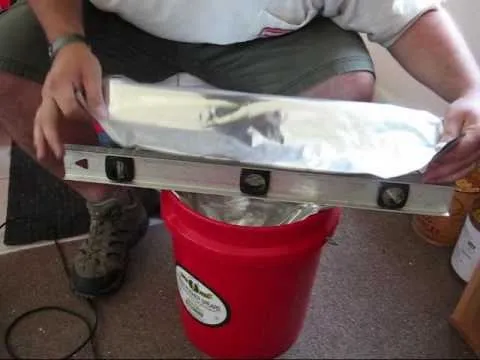
8. Seal the Bag
With the iron reached its desired temperature, place the bag on your heat-resistant surface. Using the hot iron, press down firmly along the top edge of the bag for approximately 5-10 seconds. Move the iron steadily along the seam, ensuring consistent pressure. Visualize the process as a sculptor molding clay—each pass shapes the seal to perfection.
9. Inspect the Seal
Like a jeweler examining a newly crafted gem, take the time to inspect your seal. Check for any gaps or irregularities, as a compromised seal could invite the very foes you seek to fend off: air and moisture. If you suspect any vulnerabilities, apply the iron once more to reinforce the bond.
10. Cool and Store
Allow the sealed Mylar bag to cool naturally; the fusion of materials requires time to solidify. Once cooled, your bags will be prepared for storage; place them in a dark, cool area to optimize their lifespan. This final step is akin to placing your sculpted masterpiece in a protective display—ensuring its integrity for years to come.
Conclusion
Sealing Mylar bags with a clothes iron is a method that blends artistry with practicality, offering an accessible technique for preserving your treasured edibles. By following these steps with care and precision, you can safeguard your food items against the ravages of time and nature. Embrace the process, and revel in the knowledge that you are not simply sealing bags; you are safeguarding flavors and memories, ensuring they remain as delightful as the day they were harvested. Let your endeavors in food preservation transform your kitchen into a sustainable reservoir of resources, brimming with vitality and flavor.


Leave a Comment