Is your vehicle’s auto window tint beginning to bubble, fade, or peel like an unguarded sunburn? If so, it may be time to embark on the audacious quest of removing it. This task can feel like a daunting challenge, especially if you’ve never tackled it before. However, with the right tools and steps, you can reclaim your windows and enjoy a crystal-clear view. Let’s explore the intricacies of debunking the tinted veil from your car windows.
Before diving into the removal process, consider the reasons for your decision. Perhaps the tint is no longer appealing or has become a liability due to local regulations. Either way, clearing the windows requires a strategy to successfully unveil your car’s pristine glass. Below is a comprehensive guide encompassing tools, techniques, and helpful tips that can guide you through the process.
Necessary Tools for Tint Removal
- Steamer: A handheld steam cleaner can help in loosening the adhesive.
- Plastic Scraper or Razor Blade: An essential for peeling off the tint without scratching the glass.
- Soapy Water Solution: A mixture of water and dish soap is effective for wetting the adhesive surface.
- Ammonia: This powerful cleaning agent can break down adhesives and can be applied carefully.
- Microfiber Cloths: To keep the workspace clean and wipe off residues.
- Garbage Bag: Handy for holding the discarded tint once removed.
Preparation Steps
Before embarking on the removal journey, prepare your workspace. Choose a well-ventilated area, preferably out of direct sunlight, as excessive heat can make the adhesive more stubborn. Gather all necessary tools and materials; having them within reach will streamline the process and reduce frustration.
Additionally, make sure to protect your vehicle’s interior surfaces by placing coverings on the seats and door panels. A small inconvenience now can prevent long-term damage to your vehicle’s upholstery.
The Removal Process
Now, let’s delve into the nitty-gritty of the removal procedure.
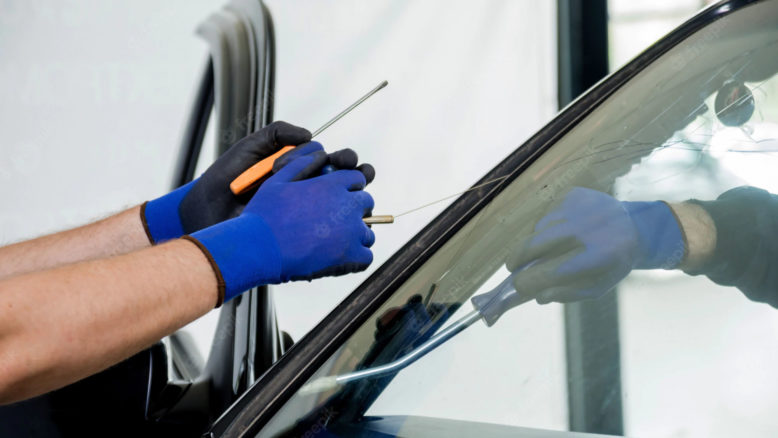
- Start Weakening the Adhesive: If you are using a steamer, begin by directing the steam towards one corner of the window tint. Hold the steamer a few inches away to avoid directing too much heat at once, which may risk breaking the glass. If you do not have a steamer, spray the window with your soapy water solution liberally. Allow it to soak for a few minutes to penetrate the adhesive.
- Peel Off the Tint: Once the adhesive has softened, use a plastic scraper or a razor blade to gently lift the corner of the window film. It is crucial to angle your tool correctly to lift the film without scratching the glass beneath. Slowly peel the tint away from the window. If you encounter any resistance, apply more steam or solution and continue peeling. Patience is key in this step.
- Address Residual Adhesive: After successfully removing the tint, you may still notice some stubborn adhesive remnants on the glass. Apply a mixture of ammonia and water to the surface or use your soapy water solution. Allow it to sit for a few minutes, then scrape it off gently using your plastic scraper. Repeat the process until all residues are entirely removed.
- Finishing Touch: Once all residues have been cleared, wash the window using a glass cleaner for a final polish. Buff it with a clean microfiber cloth to leave it spotless.
Common Challenges Encountered
While this process might seem straightforward, obstacles often arise. The adhesive could be particularly stubborn, or the tint could tear during removal, creating a puzzle of tiny pieces to contend with. In such cases, don’t lose hope. Breathe, reassess, and apply additional steam or solution to break the adhesive down further. You may also need to repeat removing smaller sections at a time to manage your progress effectively.
Health and Safety Precautions
While embarking on this journey, it’s imperative to prioritize health and safety. Ensure good ventilation in the workspace when using ammonia or any cleaning solution. Wear protective gloves and eyewear to shield yourself from irritation or injury. Additionally, take care when handling sharp tools to prevent accidental cuts.
Final Thoughts
In conclusion, removing auto window tint may initially appear as a formidable challenge. However, with the right preparation, tools, and strategies, it can transform into a rewarding experience. Whether you’re restoring your car’s aesthetic appeal or ensuring compliance with local laws, embracing this DIY project empowers you along the way. As you gaze through your newly cleared windows, take pride knowing you conquered the tint removal challenge—one meticulous step at a time.


Leave a Comment