Washing walls painted with flat paint can often feel like traversing a delicate landscape, where one misstep could transform a pristine canvas into a somber tableau. The beauty of flat paint lies in its velvety allure, creating an aura of warmth and sophistication, but its matte finish makes it notoriously susceptible to stains and marks. As such, its maintenance requires a gentle touch and a keen understanding of the unique characteristics inherent to this particular paint type. Here’s a comprehensive guide on how to effectively wash walls painted with flat paint, ensuring that these walls retain their enchanting visual appeal.
Understanding Flat Paint
Before delving into the washing techniques, it’s paramount to understand what flat paint is and why it necessitates special care. Flat paint, with its non-reflective finish, absorbs light rather than reflecting it, giving rooms an inviting warmth. Yet, this very quality makes it prone to gathering dust, fingerprints, and accidental food splatters, much like a sponge eagerly soaking up the vibrancy of its surroundings. Recognizing the distinct attributes of flat paint is the first step in preserving its aesthetic integrity.
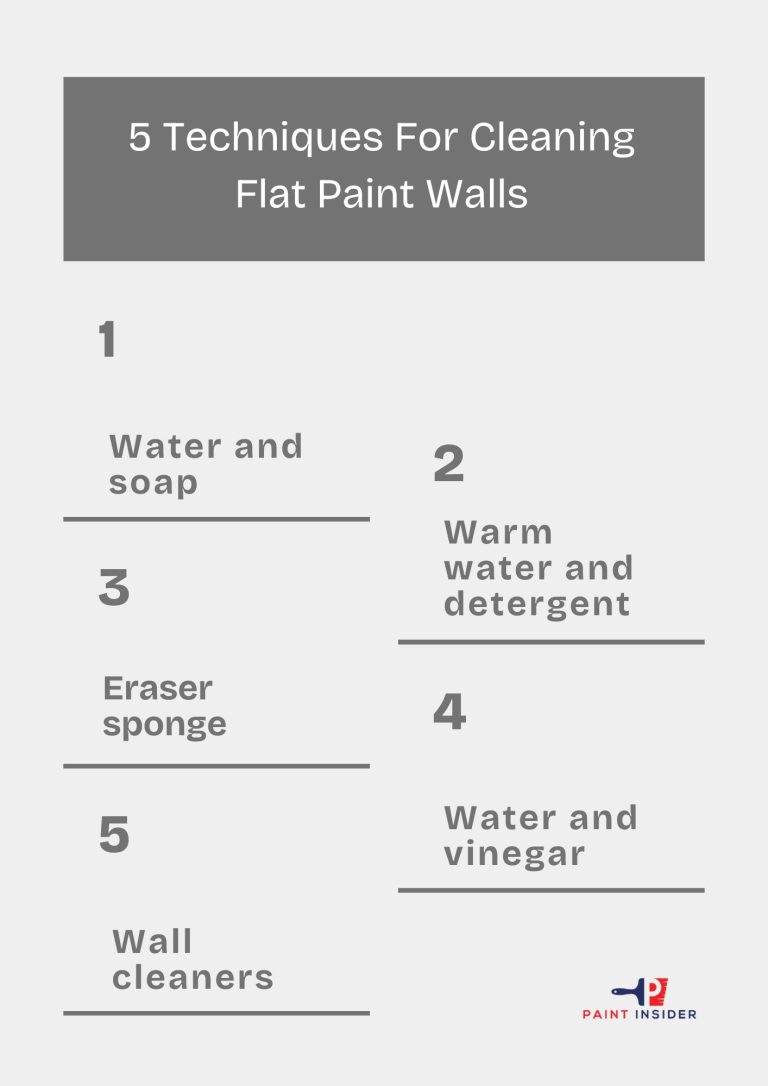
Preparation: Gathering the Tools
The first phase of any cleaning endeavor is preparation. It’s akin to an artist arranging their palette before embarking on a masterpiece. For washing walls, you will need:
- Soft, Non-Abrasive Cloths: Microfiber cloths are ideal for their gentle touch and efficacy.
- Sponges: A clean sponge aids in an even application of the cleaning solution.
- A Bucket: This will hold your cleaning solution, functioning as your mixing vessel.
- Gentle Cleaning Solution: Opt for a mix of warm water with a few drops of dish soap or a dedicated pH-neutral cleaner.
- Protective Gear: Rubber gloves will protect your hands, while a face mask may be prudent if you are sensitive to cleaning agents.
Once your arsenal is assembled, you’re ready to embark on this cleansing journey.
Step 1: Dusting the Surface
Before introducing any moisture to the flat paint, it’s crucial to remove any layer of dust that may have settled. This step is akin to a sculptor chiseling away at rough edges to reveal the masterpiece beneath. Using a dry microfiber cloth or a feather duster, gently wipe down the walls, working from top to bottom. This is not merely a cosmetic procedure; it prevents dirt from turning into mud when mixed with water, which can damage the flat finish.
Step 2: Crafting Your Cleaning Solution
With the walls dust-free, it’s time to create your cleaning concoction. Fill a bucket with warm water and add just a few drops of dish soap, stirring gently to create a lather. This mixture serves as a gentle lubricating balm—an elixir designed to lift away grime without coercion. Avoid using harsh chemicals or abrasive cleaners, as they can mar the finish and potentially lead to discoloration.
Step 3: Testing an Inconspicuous Area
Before unleashing your cleaning solution on the entire expanse, perform a patch test on a small, inconspicuous area. This precautionary measure acts as a compass guiding you toward the safest cleaning methods. Apply a small amount of the solution with a sponge, rinse with clean water, and observe how the surface reacts. Wait for a few minutes, and if the paint remains unscathed, you may proceed with confidence.
Step 4: Washing the Walls
Now comes the moment of truth. Dip your sponge into the cleaning solution, allowing it to absorb the liquid, but refrain from saturating it to prevent excess water from running down the wall. Begin at the top of the wall and work your way down, as gravity draws dirt downward. Use gentle, circular motions, caressing the surface rather than scrubbing vigorously. Imagine you are giving the wall a delicate massage rather than a harsh scrubbing.
Should you encounter stubborn stains, apply a little extra cleaning solution directly onto the affected area and allow it to dwell for a moment before resuming your gentle exfoliation. This patience pays homage to the wall’s original elegance, allowing the paint to breathe freely once more.
Step 5: Rinsing Off
Once you’ve lovingly cleaned all the marked areas, it’s critical to remove any soap residue. This process is akin to rinsing a fine silk scarf; you want every vestige of the cleaning solution gone. Rinse your sponge thoroughly in clean water, then wipe the walls using a damp cloth or sponge. Again, working from top to bottom will ensure that any leftover soapy residue is unobtrusively washed away.
Step 6: Drying the Surface
Finally, allow the walls to dry fully. You may wish to speed up this process by using a fan, but avoid direct sunlight as it may cause the paint to change as it dries. Remember, a wall painted with flat paint is like a fine wine—just as delicate flavors emerge over time, allowing paint to dry naturally retains its intended beauty.
Conclusion: The Art of Maintenance
Washing walls painted with flat paint is a delicate art form that requires patience, knowledge, and a gentle hand. By understanding the nuances of flat paint, preparing adequately, and employing thoughtful techniques, you can maintain the allure of your walls. Just as a gardener nurtures their blossoms, tending to your flat-painted walls ensures they remain a vibrant part of your home’s aesthetic landscape. With these meticulous methods, your walls will remain a testament to your care and attention, standing proudly as the backdrop to your cherished memories.


Leave a Comment