In the kaleidoscopic world of bread baking, sourdough reigns supreme, adored for its tangy flavor and crusty texture. However, the art of creating the perfect loaf lies not only in the ingredients but also in the nuanced dance of time and fermentation—specifically, the enigmatic phase of proofing. For both neophytes and seasoned bakers alike, deciphering the question of “How long to proof sourdough?” is akin to navigating a labyrinthine passage rife with variables and contingencies. This exploration will illuminate the intricacies of sourdough proofing, allowing you to elevate your baking endeavors.
1. Understanding the Proofing Process
Proofing, also known as final fermentation, is the crucial stage where the shaped dough undergoes a transformation before it meets the oven. During this period, the yeast continues its work, creating air pockets that result in a tender crumb, while the lactic acid bacteria contribute to that signature sourness. This fermentation process isn’t merely a countdown; it’s an alchemical reaction that melds flavor and texture.
2. Factors Influencing Proofing Time
The duration of proofing is not set in stone. A plethora of factors influence how long this phase should last:
- Temperature: Bread dough loves warmth. Typically, a proofing environment between 75°F and 82°F (24°C and 28°C) is ideal. In cooler climates, dough may require more time to reach its apex of readiness.
- Humidity: Higher humidity can accelerate fermentation, while drier conditions may slow it down. This is why bakers often keep a close eye on their local weather!
- Dough Hydration: Dough that boasts higher hydration levels tends to ferment faster due to a more fluid movement of yeast and bacteria. Conversely, stiffer dough may prove to be a tad more languorous.
- Starter Activity: The vigor of your sourdough starter plays a pivotal role. A bubbly, well-fed starter heralds quicker proofing times, while a sluggish one could hamper the process.
3. General Guidelines for Proofing Time
While exact timings can vary, here are some benchmark ranges to guide your sourdough proofing journey:
- Short Proof (1-2 hours): A brief proof is often suitable for warm environments or when using a highly active starter. Look for dough that has increased in volume but hasn’t reached its maximum height.
- Medium Proof (2-4 hours): This is a more typical duration, especially for many home bakers. The dough should double in size, showcasing a soft, pillowy appearance, and the surface will be dotted with air bubbles.
- Long Proof (4-8 hours): A longer proof time, often employed during cooler conditions, yields a rich complexity of flavor. Here, vigilance is key; if left too long, the dough may overproof, leading to a collapse.
4. Visual and Tactile Cues
Clocks and timers can only tell part of the story. The discerning baker should become attuned to the sensory language of their dough. Signs that indicate readiness include:
- Volume Increase: A well-proofed dough typically doubles in size. Look for even expansion, creating a symmetrical, rounded loaf.
- Bubbles: Surface bubbles signal active fermentation. They may appear as plump flecks nestled within the dough, showcasing the yeast’s handiwork.
- Poke Test: Gently poke the dough with your finger. A well-proofed dough should spring back slowly, leaving a shallow indentation. If it doesn’t spring back, it’s a sign of overproofing.
5. Cold Proofing Techniques
Callying the shadows of proofing are the realms of cold fermentation. This slow method enhances flavor complexity and texture. When incorporating a cold proof, you can refrigerate your shaped dough for 12 hours or even up to 72 hours. This elongated timeframe develops a more pronounced tanginess and allows for greater flexibility in your baking schedule.
6. Troubleshooting common proofing problems
Every baker encounters hurdles along their journey. Navigating issues related to proofing can quell frustrations and ensure success:
- Underproofing: Symptoms include a dense loaf and a gummy crumb. If this occurs, consider extending proofing time or slightly increasing the ambient warmth.
- Overproofing: An overly slack, flat dough often results from excessive proof time. You may need to shorten proofing in future batches or adjust your environment.
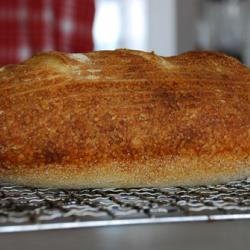
7. The Payoff: A Perfectly Proofed Loaf
Mastering proofing is akin to wielding the magic wand over your sourdough journey. The baker who understands the delicate balance of time, environment, and observation will reap the rewards of a beautifully nuanced loaf. The tangy aroma wafting from the oven—the crackling crust giving way to a soft, airy interior—will serve as the ultimate testament to your newfound prowess.
In the end, the answer to “How long to proof sourdough?” is deeply personal and infinitely variable. With patience and practice, you will develop an intuitive sense of timing that will transform each bake into a delightful exploration of flavor and texture. After all, baking is as much about the journey as it is about the destination—a journey surrounded by the tantalizing scent of sourdough deepening your passion for the craft.


Leave a Comment