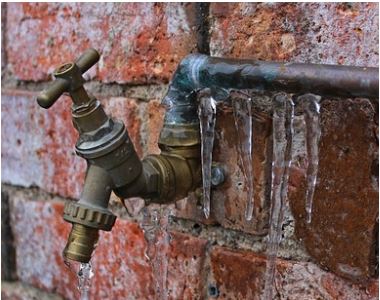
The chill of winter often brings with it the unwelcome phenomenon of frozen pipes. Homeowners across regions with frigid temperatures frequently grapple with this circumstance, which can lead to significant damage and unsettling inconveniences. The prospect of a freezing pipe prompts an instinctive concern; it serves as a tangible reminder of the fragility of our domestic structures in the face of nature’s whims. Addressing this issue demands a blend of pragmatism and knowledge to safeguard one’s abode against the icy grasp of winter.
Understanding Why Pipes Freeze
Before delving into remedies, it is essential to comprehend the mechanics behind frozen pipes. Water, when subjected to sub-zero temperatures, expands as it crystallizes into ice. This expansion applies pressure to the pipe walls, which can lead to ruptures and leaks—sometimes only apparent once the defrosting process commences. Vulnerable areas often include exterior walls, unheated or underheated spaces, and sections that are uninsulated. Additionally, plumbing systems that experience stagnant water, due to low temperatures or insufficient circulation, are particularly susceptible to freezing.
Immediate Steps to Take When Pipes Freeze
If you find yourself facing the unsettling situation of a frozen pipe, remain calm. Rapid action can mitigate damage. Here is a systematic approach:
1. Identify the Frozen Pipe
Begin by checking all faucets in your home. If water is flowing normally in some fixtures while others remain stubbornly dry, you likely have a localized frozen pipe. Trace the lines from the non-flowing faucet to identify the affected area. Often, these obstructed sections lurk within walls or crawl spaces.
2. Shut Off the Water Supply
Once you’ve pinpointed the frozen segment, act promptly to minimize potential flooding and damage. Locate the relevant shut-off valve and turn it off. This action can prevent further complications should the pipe burst during thawing.
3. Thaw the Pipe Gradually
With the water supply shut down, it’s time to thaw the affected pipe. Employ gentle heat sources to encourage a slow melting process. Some effective methods include:
- Hair Dryer: Use a hair dryer to apply heat directly to the pipe’s surface. Move slowly and continuously to prevent overheating any specific area.
- Heating Pads: Wrapping the pipe with heating pads or towels soaked in hot water can effectively increase temperature without introducing sudden heat.
- Space Heaters: For pipes located in unheated areas, space heaters can provide ambient warmth, shortening the duration before pipes thaw.
A void using open flames, such as blowtorches, as this can exacerbate the problem instead of alleviating it.
4. Keep the Faucet Open
As you employ heat to thaw the pipe, keep the affected faucet open. This allows any melting ice to escape, reducing pressure on the pipe and facilitating the thawing process.
5. Monitor Closely
Stay vigilant throughout the thawing period. Be prepared to shut off the water supply completely if a rupture occurs. Listen for any unusual sounds such as cracking or hissing, which may indicate impending disaster.
Post-Thaw Precautions
Once the pipe has successfully thawed and water flows freely, the next step involves preventive measures. Here are essential strategies to avert future freezes:
6. Insulate Pipes
Employ insulating sleeves or tape around vulnerable pipes, particularly those located in unheated areas. Insulation minimizes the risk of freezing by creating a barrier against cold temperatures.
7. Ensure Proper Heating
Maintain consistent thermostat settings, even during extended absences from home. The temperature should be kept above 55°F in all areas, particularly where plumbing exists.
8. Allow Faucets to Drip
During periods of extreme cold, consider allowing faucets to drip slightly. This keeps water flowing through the pipes, reducing the chances of ice buildup. A steady drip can be a boon during prolonged cold spells.
9. Open Cabinet Doors
When temperatures plummet, open the cabinet doors beneath sinks, especially those adjacent to exterior walls. This simple act enables warm air to circulate around plumbing, further minimizing freeze risk.
10. Seal Cracks and Holes
Conduct a thorough inspection of your home, sealing any gaps or cracks that might allow frigid air to infiltrate. Look around windows, doors, and where pipes exit the house, employing caulk or insulation as necessary.
Conclusion
The prospect of frozen pipes evokes concern; however, with informed preparation and prompt action, it is possible to navigate this seasonal challenge. Being proactive not only protects the integrity of plumbing but also preserves the comfort of home during the harsh winter months. As nature’s icy breath seeks entry, let your knowledge serve as a fortified bulwark against its intrusion, ensuring tranquility and safety in your living space.


Leave a Comment